


.png)

How Do You Unfreeze an Air Conditioner?


Government Rebates Now Available on Energy-Efficient Air Conditioners when Replacing your Gas Heater.
A frozen air conditioner means ice has formed on the evaporator coil or refrigerant lines, blocking heat exchange and preventing cooling; the immediate action is to power down the compressor and use warm air to defrost the coil safely. This guide explains how to identify AC coil freezing symptoms, perform safe DIY defrosting, diagnose underlying causes like low refrigerant or restricted airflow, and decide when to call a professional. Readers will learn step-by-step defrost methods, practical diagnostic checks for filters, condensate drains and blower motors, as well as prevention strategies including maintenance schedules and smart-thermostat monitoring. The article also covers likely repair scenarios, transparent cost examples, and how certified technicians address refrigerant leaks and coil damage. Sections include immediate safe unfreeze steps, common causes, home diagnostics, professional thresholds, prevention checklists, cost breakdowns, FAQs, and a system-level explainer to make future freezing far less likely.
What Are the Immediate Steps to Safely Unfreeze Your AC Unit?
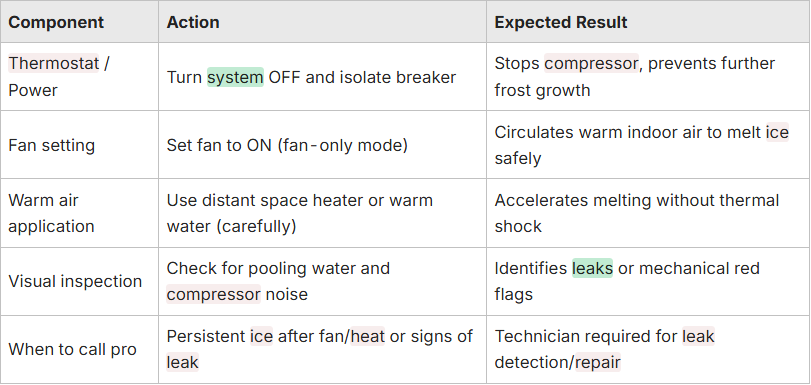
A frozen AC unit requires an immediate, prioritised safety-first approach: define frozen status, isolate power to the compressor, and apply warm-air defrosting to restore heat exchange while avoiding component damage. The mechanism is simple like stop the compressor so refrigerant flow and pressure stabilise, then circulate warm room air to melt surface ice; the benefit is preventing compressor damage and water intrusion. Follow the numbered how-to steps below, observe safety warnings, and stop DIY action when red flags appear. Next, clear instructions show how to switch off systems safely and use fan or heat sources to defrost without adding risk.
How Do You Turn Off and Prepare Your Air Conditioner for Defrosting?
First, define the preparation: powering down prevents further refrigerant circulation and protects the compressor from liquid slugging, which can cause catastrophic damage. Begin by setting the thermostat to OFF and switching the system to fan-only or turning off the outdoor unit at its service switch; then, if comfortable and safe, isolate the breaker to remove all power. Inspect the area around the indoor evaporator for pooling water and clear floor drains or towels to collect melt; avoid chipping ice from coils as fins and tubes are fragile. Preparing the unit this way reduces electrical risk and positions you to use warm air safely for controlled defrosting.
What Role Does Setting the Fan to ON Play in Defrosting?
Setting the indoor fan to ON circulates room-temperature air across the frozen evaporator coil, gradually transferring heat that melts ice without engaging the compressor or applying direct heat sources. The mechanism is convection-driven: moving warm air over the coil raises surface temperature above freezing and allows condensation to revert to liquid, which drains away safely. Run the fan continuously and monitor the coil periodically; typical melting times vary with ice volume and room temperature. If ice persists after 30–60 minutes of fan-only circulation, stop and reassess to avoid hidden causes like low refrigerant or severe airflow restriction.
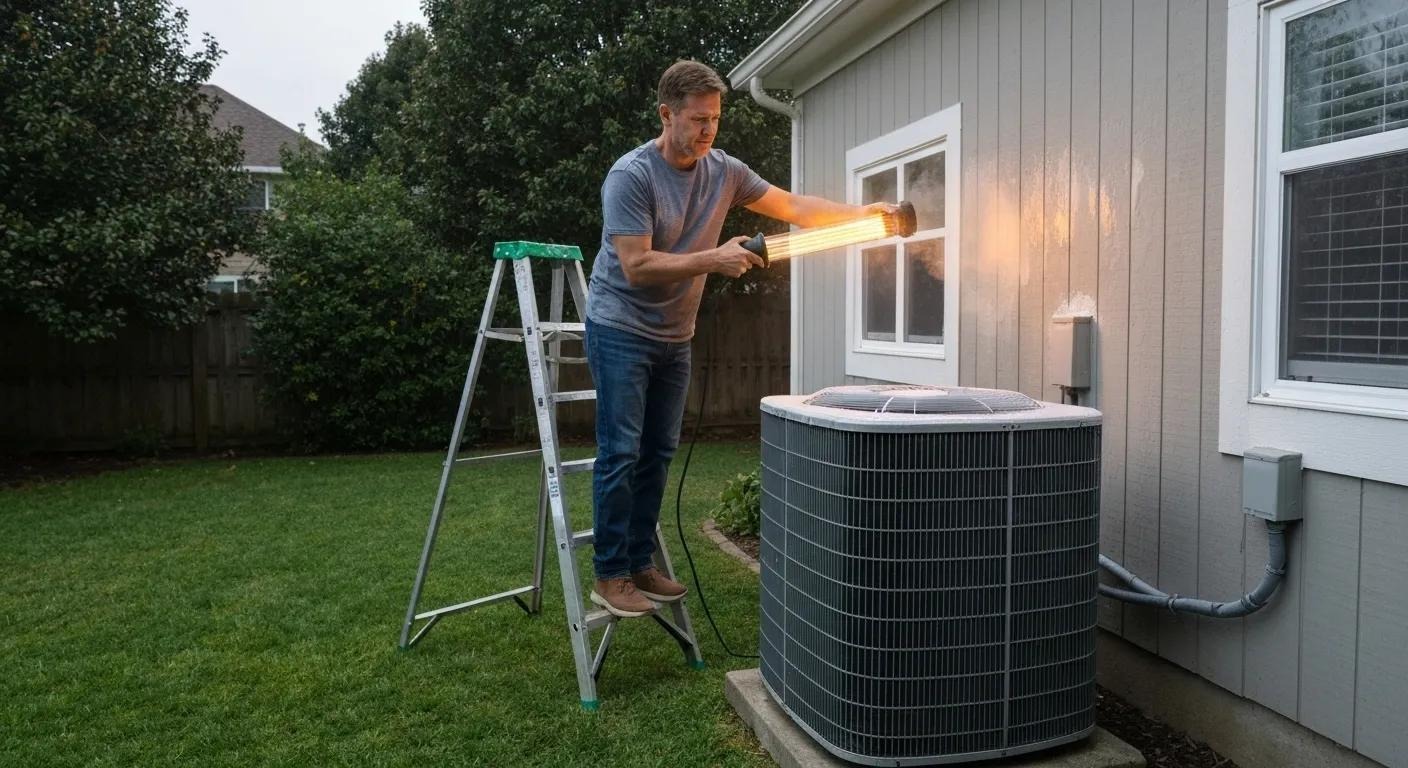
How Can You Use Warm Air or Heat to Defrost Frozen Coils Quickly?
Applying warm air accelerates melting when fan-only circulation is insufficient, but choose safe heat sources and avoid direct high-temperature tools that risk electrical damage or warped fins. Safe options include placing a portable space heater at a safe distance (do not blow hot air directly into electrical components) or using warm water on exterior drip pans and accessible surfaces to encourage melt. Avoid hair dryers or torches near refrigerant lines, and never force ice removal with sharp tools; incremental, monitored warming is the recommended approach. The expected result is controlled melt and drainage without harming the evaporator assembly.
When Should You Avoid Running a Frozen AC Unit?
Do not run the compressor while coils are frozen: continued operation risks liquid refrigerant entering the compressor (liquid slugging), overheating, and rapid component failure that leads to costly repairs. Red flags that require immediate shutdown include heavy ice masses, hissing indicative of a refrigerant leak, or compressor cycling anomalies; these signs point to deeper mechanical or refrigerant problems. If you observe those symptoms, isolate power and contact professional service rather than attempting further DIY. Avoiding operation in these cases protects the compressor and reduces downstream damage risk.
Before the next section, consider that while many homeowners can safely perform basic defrost and inspections, persistent freezing, suspected refrigerant leaks, or compressor concerns are beyond DIY scope. Oz Air Group offers expert AC repair and maintenance services including diagnostics, defrosting, coil cleaning, refrigerant services and component replacement for situations where DIY is insufficient. If professional help is needed after these steps, scheduling an inspection with Oz Air Group’s certified technicians brings rapid-response attention and transparent service guidance.
What Are the Common Causes of a Frozen AC Coil?
A frozen evaporator coil has several common root causes: restricted airflow (commonly dirty filters), low refrigerant from leaks, blocked condensate drainage, blower motor failure, or thermostat misbehavior. Mechanistically, restricted airflow prevents warm air from reaching the coil so refrigerant expands to lower temperatures, causing condensation to freeze; low refrigerant drops evaporator pressure and temperature below freezing. Understanding these causes helps homeowners target diagnostics effectively and choose between DIY fixes or professional repairs. The next subsections break each cause down into how it leads to freezing, diagnostic clues, and recommended remediation.
How Does a Dirty Air Filter Cause Your AC Evaporator Coil to Freeze?
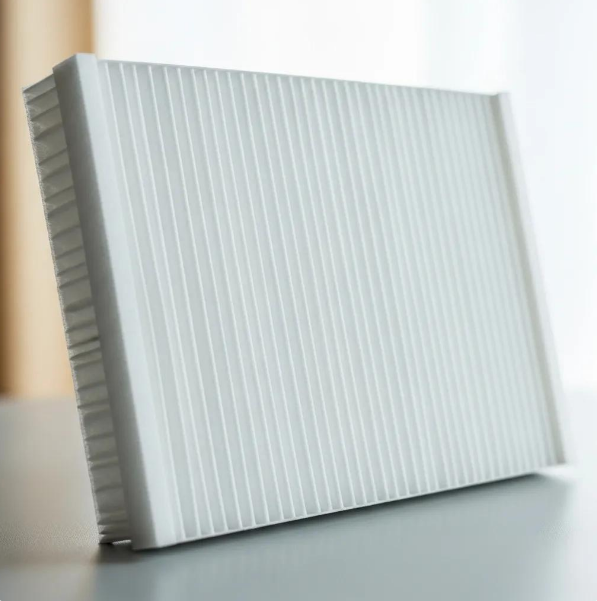
A dirty air filter restricts airflow across the evaporator coil, reducing heat transfer and causing coil surface temperatures to fall below freezing, which condenses and freezes moisture. Typical evidence includes weak airflow at vents, dusty visible filters, and a sudden decline in cooling performance despite long run times. The DIY action is straightforward: inspect and replace the filter with the correct size and recommended MERV rating, and monitor whether normal airflow returns. If replacement doesn’t restore airflow, further duct or blower inspection is required and may warrant professional cleaning.
Why Does Low Refrigerant Lead to AC Coil Freezing?
Low refrigerant lowers evaporator pressure, which in turn reduces refrigerant boiling temperature and causes the coil to run colder than intended, often dropping below 32°F and forming ice. Signs of a refrigerant issue include reduced cooling capacity, hissing noises, oil residue near fittings, or repeated freeze cycles even after proper airflow is restored. Because refrigerant handling is regulated and requires certified tools and procedures, professional leak detection and sealed-system repair are the appropriate remedies. Addressing leaks and recharging to manufacturer charge ensures proper pressure-temperature balance and prevents recurring freezing.
How Can a Blocked Condensate Drain Line Result in Ice Formation?
A blocked condensate drain causes water to back up into the drain pan or onto cold surfaces near the evaporator, which can freeze in low-temperature zones or exacerbate existing frost on coils. DIY checks include visually inspecting the drain line, pouring warm water through the drain, or using a wet-dry vac at the condensate access to clear clogs. If blockages are persistent caused by biofilm, algae, or structural issues, professional drain cleaning and corrective measures are recommended. Clearing the drain restores safe condensate removal and reduces the chance of secondary freezing and water damage.
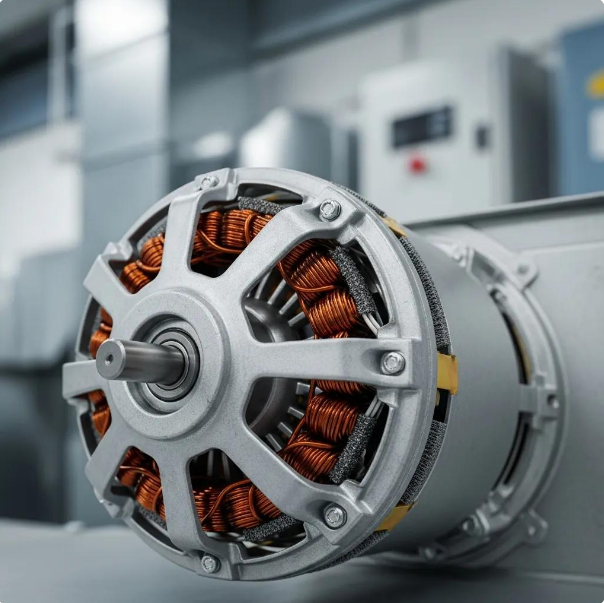
What Impact Does Poor Airflow or Blower Fan Malfunction Have on Freezing?
The blower fan supplies the airflow required for heat exchange; motor failure, belt issues, or obstructions reduce airflow and allow coil temperatures to fall to freezing. Simple tests include listening for fan operation, feeling airflow velocity at vents, and noting unusual noises or vibrations. If the fan motor is failing or capacitors are weak, a technician’s diagnostics and component replacement will restore proper airflow and prevent recurrent freezing. Ensuring consistent airflow is foundational for coil temperature control and overall AC performance.
Can a Faulty Thermostat Cause Your AC to Freeze Up?
A thermostat that misreads temperature or fails to cycle the compressor correctly can cause continuous cooling and over-run conditions, allowing the evaporator to reach freezing temperatures. Quick checks include verifying thermostat settings, replacing batteries if applicable, and ensuring the unit is not installed in a location with misleading heat sources or drafts. If recalibration or replacement of the thermostat does not correct abnormal run times, professional troubleshooting of control circuits and sensors is indicated. Correct thermostat operation maintains proper cycle timing and reduces freeze risk.

How Do You Diagnose and Troubleshoot Frozen AC Issues at Home?
Diagnosis starts with identifying signs that confirm freezing and then performing high-value checks that distinguish airflow, drainage, and refrigerant problems from one another. The mechanism is systematic elimination: confirm ice visually, then restore airflow and observe whether the ice melts; if it does not, suspect refrigerant or mechanical failures. The value is reducing unnecessary service calls and directing professionals to the real fault when needed. The following subsections provide specific signs and step-by-step checks you can perform safely.
What Are the Signs Your AC Evaporator Coil Is Freezing Up?
Clear signs include visible ice or frost on the evaporator coil or refrigerant lines, reduced or warm air at supply vents despite a running compressor, and water pooling around the indoor unit as ice melts. Additional indicators are longer run cycles, rising energy use, or intermittent cycling that doesn’t restore cooling. Physically inspect for frost and check vent airflow; never touch wiring or internal components without isolating power. Recognising these symptoms early reduces the likelihood of compressor damage and speeds corrective action.
How Can You Check and Replace a Dirty Air Filter?
Locate the filter at the return grille or air handler, remove it, and hold it up to a light source. If light is blocked by dust, replace it with the correct size and recommended MERV rating for your system. Replacement frequency varies but is typically monthly during heavy use; higher-MERV filters improve filtration but may affect airflow if improperly selected. When replacing, note the filter direction arrow and ensure a snug fit. If airflow problems persist after correct filter installation, proceed to blower and duct inspection.
How Do You Inspect the Condensate Drain Line for Blockages?
Start by visually checking the drain pan and the access point for algae, debris, or standing water, then carefully pour warm water into the drain to see if it flows freely; use a wet-dry vac at the condensate access if accessible. For persistent clogs, a diluted vinegar flush can break down biofilm, but avoid harsh chemicals that may damage PVC or nearby components. If the clog returns or the drain trap is inaccessible, schedule professional drain cleaning to prevent recurring backup and freeze-related water damage. Regular drain inspection is a low-cost prevention step that yields immediate benefits.
What Are Simple Tests for Blower Fan and Thermostat Functionality?
Listen for the blower when the system calls for cooling, observe airflow speed at supply vents, and check for unusual sound or vibration that suggests motor or bearing wear; use simple handheld thermometers to compare return and supply temperatures. For thermostat checks, verify settings, battery condition, and sensor placement; a mislocated thermostat can cause over-run issues. If airflow is weak despite fan operation, a capacitor or motor issue may exist and requires professional testing equipment. These simple tests help decide whether a DIY fix is possible or a technician's diagnostics are needed.
- Diagnostic checklist for homeowners to follow:
This numbered checklist guides you through high-impact checks that reliably separate simple fixes from problems needing professional attention.
When Should You Call a Professional HVAC Technician for Frozen AC Repair?
Call a professional when red-flag issues indicate sealed-system problems, compressor risk, or suspected refrigerant leaks are situations where certified tools and regulatory handling are required. Technicians will perform diagnostics such as pressure testing, leak detection, coil inspection, and component health checks; these steps restore proper pressure-temperature balance and ensure safe refrigerant handling. For emergency frozen AC repair, prompt professional response prevents compressor damage and reduces total repair costs. The next subsections detail advanced issues that require technician intervention and describe how professionals approach repair vs replacement decisions.
What Advanced Issues Require Expert Refrigerant Leak Detection and Repair?
Refrigerant leaks require certified detection because they affect pressure-temperature characteristics and involve environmental regulations; technicians use electronic leak detectors, UV dye, and pressure testing to locate and quantify leaks. Repair typically involves sealing the leak, evacuating the system to remove moisture and non-condensables, and recharging to proper manufacturer-specified charge; certified handling ensures compliance and system longevity. Signs you need this service include continual freeze despite airflow fixes, hissing noises, or visible oil residue at fittings. Professional leak detection preserves performance and prevents repeat freezing by restoring correct refrigerant charge.
How Are Damaged Evaporator or Condenser Coils Professionally Repaired or Replaced?
Technicians assess whether coils can be cleaned, fin-straightened, or patched versus needing full replacement; decision criteria include corrosion level, tube damage, accessibility, and cost-effectiveness. Professional coil cleaning restores heat-transfer efficiency, while replacement involves brazing, fitting new assemblies, and pressure-testing the sealed system. Expected downtime depends on access and parts availability, and techs will advise on warranties and long-term performance implications. Proper technician handling ensures coil integrity and prevents future freezing due to degraded heat exchange surfaces.
Why Is Compressor Failure an Important Reason to Seek Professional Service?
The compressor is the system heart such as failure risks contamination, seized components, and extensive sealed-system repair; DIY attempts to address compressor issues risk further damage and safety hazards. Symptoms include loud or unusual compressor sounds, failure to build pressure, or electrical trip events; technicians evaluate electrical, mechanical, and refrigerant system factors to determine repair or replacement. Professional replacement includes correct sizing, oil management, and leak testing to avoid repeated failures. Because compressor actions directly control refrigerant circulation, addressing failure properly prevents cascading damage.
How Does Oz Air Group Provide Rapid Emergency Frozen AC Repair?
Oz Air Group positions itself for rapid-response frozen AC issues by deploying certified technicians who perform diagnostics, emergency defrost measures, and staged repairs to restore cooling quickly while preserving system integrity. In a case study example, a rapid emergency response that combined interim defrost, leak detection, and a targeted refrigerant recharge prevented compressor replacement and restored home cooling within a single service visit. Oz Air Group’s approach emphasises diagnostics, sealed-system safety, and transparent pricing to guide homeowners through necessary repairs. If you face urgent freezing that threatens equipment, contact Oz Air Group to request prioritised diagnostic attention from certified technicians.
How Can You Prevent Your Air Conditioner from Freezing in the Future?

Prevention centers on maintaining airflow, correct refrigerant charge, clean coils and drains, and proper thermostat operation; these measures preserve heat-transfer balance and avoid conditions that let coils fall below freezing. The mechanism is ongoing maintenance that addresses the root causes before ice develops; the benefit is increased efficiency, lower energy bills, and reduced emergency repair risk. Below are specific checklist items, filter guidance, coil-cleaning rationale, refrigerant check frequency, and smart-thermostat recommendations. Integrating these steps into a seasonal program yields measurable reductions in freeze-related failures.
What Is the Recommended AC Maintenance Checklist to Avoid Frozen Coils?
A regular maintenance program includes monthly filter checks, seasonal coil inspections and cleaning, annual refrigerant pressure checks, condensate drain cleaning, and blower motor inspections to ensure proper airflow and drainage. Monthly tasks are homeowner-friendly; seasonal and annual tasks often require a technician for sealed-system diagnostics and coil cleaning. Documenting maintenance actions helps technicians identify trends and prevents recurring issues, and scheduled efforts reduce emergency service needs. For homeowners who prefer professional management, preventative maintenance plans offered by service providers bundle these tasks into predictable schedules.
Oz Air Group’s preventative maintenance plans are designed to ensure system longevity and efficiency through scheduled tune-ups, refrigerant checks, and professional coil cleaning; pairing these plans with expert AC repair and maintenance services creates a comprehensive strategy to reduce freeze events and emergency repairs.
How Often Should You Replace or Clean Your Air Filter?
Filter frequency depends on filter type, household conditions like pets or construction, and seasonal usage; a practical guideline is checking monthly and replacing every 1–3 months for basic filters, more frequently in high-dust environments. Higher-MERV filters catch finer particulates but can restrict airflow if not matched to the system, so consult guidance on compatible MERV ratings and change more often if flow decreases. Visual inspection is the fastest monitoring tool, replacing when light cannot pass through or dust visibly coats the media. Regular filter care is one of the simplest, highest-value preventive actions to avoid coil freezing.
Why Is Professional Coil Cleaning Important for AC Efficiency?
Dirty coils accumulate dust and grime that insulate the heat-transfer surface, lowering efficiency and increasing the chance the coil will run cold enough to freeze under load. Professional coil cleaning uses appropriate chemical cleaners and rinsing techniques, safely preserving fin integrity while restoring thermal performance. Compared to DIY surface wiping, technician-grade cleaning reaches deeper deposits and identifies hidden corrosion or fin damage that could cause long-term issues. Regular professional cleaning, scheduled seasonally or annually depending on the environment, maintains optimal heat exchange and reduces freeze risk.
How Do Regular Refrigerant Checks and Tune-Ups Help Prevent Freezing?
Routine refrigerant checks ensure correct pressure-temperature relationships so evaporator temperatures remain within manufacture-specified ranges, preventing low-charge situations that produce freezing. During tune-ups, technicians perform leak detection, verify charge, check expansion device function, and inspect system controls; collectively these actions stabilise operation and prevent conditions that lead to freeze cycles. Scheduling these inspections annually or as recommended by equipment guidelines catches slow leaks before they cause repeated freeze events. Regular professional attention preserves both efficiency and equipment lifespan.
Can Smart Thermostats Help Monitor and Prevent AC Freezing?
Smart thermostats monitor runtime, cycle frequency, and temperature patterns and can alert homeowners or service providers to abnormally long run times that often precede coil freezing. By exposing unusual cycles such as continuous compressor operation, smart controls provide early warning for airflow or refrigerant problems and allow remote adjustments to prevent over-run. Integration with professional monitoring or maintenance notifications improves preventive response and keeps systems operating within safe parameters. Using smart thermostat data alongside preventative maintenance yields an advanced, data-driven path to reducing freeze incidents.
What Are the Typical Costs Associated with Frozen AC Repair and Maintenance?
Typical costs vary based on required work like basic defrost and filter replacement is low-cost, while refrigerant leak detection, sealed-system repair, or compressor replacement are progressively more expensive and require certified service. Transparent pricing improves homeowner trust and decision-making by showing itemised ranges for labor and parts, enabling comparison between cleaning, repair, and replacement options. The cost table below gives indicative ranges for common frozen-AC services to help plan and budget; after the table, brief examples explain emergency surcharges and preventative plan ROI. Understanding cost drivers helps homeowners choose timely interventions that minimise total lifetime expense.

How Much Does It Cost to Clean or Replace a Frozen Evaporator Coil?
Cleaning an evaporator coil is typically the lower-cost option when corrosion or physical damage is minimal, generally ranging from one to a few hundred dollars depending on access and labor. Replacement costs rise when coils are heavily corroded or damaged and can vary widely with equipment type and accessibility. Factors affecting cost include the need to evacuate and recharge refrigerant during replacement, access complexity, and matching materials to original specifications. An on-site inspection provides the accurate basis for a detailed quote and repair plan.
What Are the Expenses for Refrigerant Recharge and Leak Repair?
Refrigerant recharge costs depend on refrigerant type, quantity required, and local regulatory handling; leak repair includes diagnostic labor and parts and can extend costs significantly if brazing or component replacement is needed. Certified handling raises labor cost but ensures legal compliance and system longevity. Example ranges in the table above provide a starting point; technicians provide exact pricing after leak detection. Addressing leaks properly avoids repeated recharges and recurrent freezing.
How Do Emergency Frozen AC Repairs Affect Pricing?
Emergency or after-hours service often incurs premium charges, reflecting technician availability and rapid-response logistics; homeowners should expect surcharge ranges for urgent visits that restore cooling quickly. Preventative maintenance plans reduce the chance of emergency interventions by identifying issues earlier and scheduling repairs proactively. Balancing the occasional emergency premium against the cost of frequent unplanned repairs demonstrates the financial value of scheduled maintenance. Prioritising prevention reduces both service costs and equipment downtime.
Are Preventative Maintenance Plans Cost-Effective Long-Term?
Preventative maintenance plans typically deliver ROI through reduced emergency repairs, improved efficiency, and extended equipment lifespan; routine inspections catch slow refrigerant leaks, worn components, and airflow issues before they escalate. Case examples show that annual tune-ups and coil cleanings reduce average emergency repair frequency and preserve compressor life. For homeowners who prefer predictable service, bundling into preventative maintenance plans makes budgeting straightforward and often lowers per-visit rates. Investing in prevention generally yields lower total ownership cost than reactive repair cycles.
What Frequently Asked Questions Do Homeowners Have About Unfreezing AC Units?
Homeowners commonly ask how long defrosting takes, whether running a frozen AC is safe, what usually causes ice, and how to distinguish DIY vs professional needs; concise answers help quick decision-making. The mechanism for answering these FAQs is to provide clear, actionable thresholds and timelines so homeowners can act promptly without risking equipment. The following short Q&As aim to capture those common decision points and guide readers to the appropriate next step.
How Long Does It Take for AC Coils to Unfreeze Completely?
Unfreeze times vary by severity: light frost often clears within 30–60 minutes with fan-only circulation, while heavy ice formations may require several hours or overnight thawing using controlled warm air. Ambient indoor temperature, ice thickness, and whether the compressor remains off all influence time to full defrost. If ice does not diminish after a reasonable defrost period or reappears quickly, suspect underlying issues like low refrigerant or airflow restrictions. Persistent freezes require technician diagnostics to prevent equipment damage.
Can I Run My AC While the Coils Are Frozen?
No, do not run the compressor while coils are frozen; doing so risks compressor liquid slugging and severe mechanical damage that often leads to costly repairs. Instead, power down the system, set the fan to ON for safe melt, and undertake the diagnostic checks outlined earlier. Running the fan-only mode helps defrost without activating refrigeration cycles, preserving compressor health. Contact a technician if freezing recurs after defrosting to address root causes.
What Causes Ice to Form on My AC Unit’s Evaporator Coil?
Ice formation is most commonly caused by restricted airflow (dirty filters, blocked vents), low refrigerant charge from leaks, condensate drain problems, blower issues, or thermostat faults; each mechanism ultimately reduces the coil temperature below freezing. Identifying which cause applies requires observing airflow, checking filters, inspecting drains, and testing for refrigerant loss. The sections above provide targeted checks and remediation steps to isolate and correct the underlying condition. Addressing the root cause prevents repeat incidents.
How Do I Know If My AC Needs Professional Repair or Just DIY Defrosting?
Use this decision checklist: if the freeze is a first-time event, and ice clears after fan-only defrost and filter replacement, DIY maintenance may suffice; if freezing recurs, if you observe hissing, oil residue, compressor noise, or if ice persists despite airflow restoration, call a professional. Recurring freezes or any sealed-system suspicion require certified diagnostics for refrigerant handling and leak repair. Choosing professional help at the right time avoids escalating damage and may save money long-term.
How Does Understanding Your AC System Help Prevent Freezing?
Understanding system components like evaporator and condenser coils, refrigerant circuit, blower fan, thermostat, and condensate pathways clarifies why maintenance and monitoring matter and how interventions affect freezing behavior. The mechanism-level insight is that refrigerant circulation and adequate airflow must be balanced for safe coil temperatures; when either side is compromised, freezing becomes likely. Greater system knowledge empowers targeted DIY maintenance and better communication with technicians. The subsections below explain coil roles, refrigerant behavior, airflow importance, and thermostat function to solidify preventive practices.
What Is the Function of the Evaporator and Condenser Coils in Cooling?
The evaporator coil absorbs indoor heat as refrigerant evaporates at low pressure, while the condenser coil rejects that heat outdoors as refrigerant condenses at high pressure; together they complete the refrigeration heat-transfer cycle. Effective heat transfer requires clean coil surfaces and unobstructed airflow; fouled or damaged coils reduce system capacity and can contribute to freezing. Regular inspections ensure coils maintain efficient thermal exchange. Understanding these roles helps homeowners prioritise coil care and recognise symptoms of heat-transfer degradation.
How Does Refrigerant Circulate and Affect Coil Temperature?
Refrigerant circulates through compressor, condenser, expansion device, and evaporator; pressure drops across the expansion device reduce boiling point so the evaporator coil becomes cold and absorbs heat from indoor air. The pressure-temperature relationship means that a low refrigerant charge lowers evaporator pressure and temperature further, increasing freeze risk. Monitoring for signs of low charge such as diminished cooling, longer cycles, or ice guides timely intervention. Maintaining correct refrigerant charge is essential for stable, non-freezing operation.
Why Is Proper Airflow Essential for AC Performance?
Airflow moves indoor heat to the evaporator coil for transfer into refrigerant; when airflow is insufficient due to clogged filters, blocked ducts, or faulty blowers, the coil temperature falls and frost forms. Common obstructions include dirty filters, closed vents, or obstructed return grills; monitoring supply and return airflow helps detect problems early. Restoring proper airflow typically resolves many freeze events without sealed-system intervention. Routine airflow checks are an easy, high-impact preventive practice.
How Does the Thermostat Control AC Operation and Prevent Freezing?
The thermostat cycles the compressor and blower to maintain set temperatures; correct cycling prevents continuous compressor operation that could lead to coil overcooling and freezing. Smart or well-calibrated thermostats limit run times and provide alerts that indicate abnormal system behavior such as long run cycles. Proper sensor placement and correct programming ensure thermostats provide accurate feedback to the HVAC system. Using thermostat data as part of a preventative strategy improves detection and reduces freeze-related incidents.
These steps combine homeowner maintenance with professional preventive care to minimise freezing risk and optimise system reliability.
Areas we service
Oz Air covers Melbourne and its northern suburbs.

Get in touch


.png)